
How to Make Soda
TL;DR: Learn how to make homemade craft cola with natural ingredients like citrus, spices, and botanicals. Follow Craft a Brew’s simple three-step process to create a delicious, healthier alternative to store-bought sodas. Use the Craft Cola Kit for all essential tools and ingredients, and experiment with fun variations like cola floats and cocktails. Enjoy the satisfaction of controlling your soda’s flavor and ingredients while discovering the joy of small-batch soda crafting.
Getting Started with Homemade Cola
If you’ve ever wondered ”how can I make soda from scratch?” - Craft a Brew’s Root Beer and Craft Cola Making Kits are your answer! Our soda kits include all natural ingredients and teach you how to make 4 liters of fizzy soda pop from scratch the old fashioned way.
With our simple process and whole botanical ingredients, you’ll make soda that’s all natural, nostalgic and non alcoholic. Our soda kits include custom blends of roots, herbs, berries & spices for classic flavor in every sip. Learn how to make soda with your kids or gift a DIY kit to the soda lover in your life.
So, how do you make soda? It’s a lot easier to make soda than you’d think! Our DIY kits use traditional techniques and ingredients dating back to the 1800’s. Back then, Root Beers and Colas were sold in pharmacies as extracts or syrups to make soda at home. That’s exactly how to make soda pop at home, too! Our kits teach you how to make soda syrup, which you’ll carbonate either with yeast OR simply by combining the syrup with seltzer water in your glass. The result is an aromatic, old-fashioned and fizzy soda in your glass - ready to drink in just a few hours!
Read on to learn how to make your own soda, step by step. We’ll show you how to make soda at home using whole botanicals, Demerara sugar & Maltodextrin.
The process is the same whether you prefer a spicy, sweet Root Beer or a zesty Craft Cola. Once you make soda the traditional way, you won’t look at store bought soda the same way again!

Download Our Guide to Making Cola
For complete step by step instructions on how to make soda, download our Guide to Making Soda. This beginner friendly process will help you turn sugar, spices & herbs into a frothy Root Beer or a traditional Cola.
What You’ll Need To Make Soda
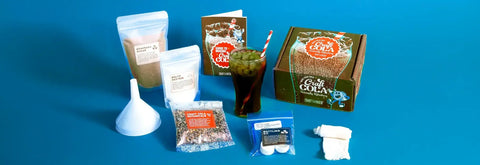
The key to great soda is quality soda ingredients. Our soda kits use all natural botanicals and specialty sugars for complex flavor and smooth mouthfeel. While there is no single recipe for Root Beer, the signature sweet & spicy flavor we all know and love historically comes from the bark of the sassafras tree or the sarsaparilla vine. Our Root Beer Kit also uses burdock root, birch bark, star anise, ginger root, cinnamon and juniper. Meanwhile, Cola gets its zesty flavor from citrus and spices. Cola gets its name from the kola nut, which was the drink’s original source of caffeine back in the 1800’s. While modern cola no longer uses the kola nut for flavor or caffeine, our Cola Kit uses cinnamon, chicory root, lemon peel, orange peel and black tea for color, flavor and caffeine.Using the below soda ingredients, you’ll first create a syrup from the sugars and botanicals. Then you’ll carbonate the syrup using either yeast or seltzer water. Try our complete Craft Cola Kit or Root Beer Kit, which include all of the necessary soda ingredients listed below (except for Seltzer Water and salt) to brew 4 liters of soda.The key to old fashioned soda flavor is a curated blend of botanicals. Our Root Beer Kit and Craft Cola Kit include prepackaged botanicals for making 4 liters of soda. We also offer Root Beer Botanicals & Craft Cola Botanicals on their own if you want to make larger batches.
Our caffeine-free Root Beer gets its flavor from licorice-y sarsaparilla, earthy burdock root, minty birch bark, zesty ginger root, warming cinnamon and piney juniper berries.Our caffeinated Craft Cola gets its flavor from a zesty blend of Chicory Root, Cinnamon, Black Tea, Coriander, Lemon Peel & Orange Peel.
This sugar is perfect for making dark sodas thanks to its rich color and subtle molasses flavor.
Maltodextrin is a mostly non-fermentable powdered sugar, which helps give your homemade soda a traditional fuller body and mouthfeel so it isn’t watery in your glass.
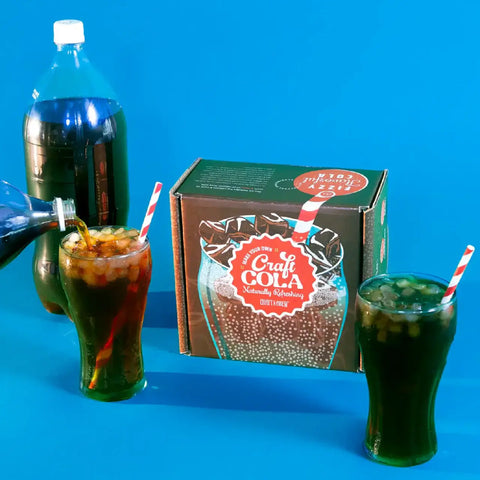
You can carbonate your homemade soda syrup one of two ways. ONE: you can simply combine 1 part syrup with 3 parts seltzer water over ice for an instant glass of soda! Personally, we love Topo Chico for this. It’s one of the most fizzy sparkling water brands and the bubbles last quite a long time in your glass. TWO: you can divide your syrup between two plastic 2 Liter soda bottles, top with water & add ¼ tsp yeast to each to naturally carbonate the soda. The yeast convert sugar into carbon dioxide in a sealed bottle. We’ll get into the specifics of this technique later.
While it may seem odd, salt is a flavor enhancer! A small addition of salt to the syrup helps brighten flavors and subtly reduce harsh acidity. We recommend ¼ tsp when making Cola and 1/2 tsp when making Root Beer.
*Included in our Root Beer Kit and Craft Cola Kit.
Essential Equipment
You’ll need a few basic pieces of equipment to ensure a smooth soda making process, so make sure you have everything below before you begin. Items with an asterisk are included in our Root Beer & Cola soda making kit!You’ll need this to brew your soda Syrup. Make sure it can fit 2 Quarts or more volume.
You’ll only need this if you choose to caramelize any sugar for your soda syrup (an optional step). This should be a flat pan (like you’d fry an egg in) for best results!
You’ll need a ¼ Teaspoon & a 1 Tablespoon measuring spoon to accurately measure ingredients throughout the process.
You’ll need a ⅓ Cup and a 1 Cup measuring cup to accurately measure ingredients throughout the process.
You’ll need a bag to keep the botanicals contained for easy removal. A medium cheesecloth bag, fine mesh nylon bag or a muslin straining bag work well.
After you’ve made your soda Syrup, you can store it in the fridge for 6 weeks. OR you can naturally carbonate your syrup instead using yeast and 2 Liter soda bottles.
Buy two 2 Liter sodas at the store & enjoy the contents. You can enjoy the soda and use the empty bottles for your homemade soda. TIP: 2 Liter bottles of club soda are usually cheaper than flavored soda.
You’ll need specialty soda bottle caps in order to safely carbonate your soda in 2 L soda bottles. Our soda making kits include 2 of these caps, which feature a specialty escape valve that prevents over carbonation or rupturing.
Reduce mess on bottling day with a funnel.
*Included in our Root Beer Kit and Craft Cola Kit.
Step-by-Step Soda Recipe
Once you have your ingredients and your equipment, or our complete soda kit, you’re ready to follow our easy soda recipe! This step by step guide produces about 32 oz of soda Syrup, which is used to make 4 Liters of finished soda pop. Following our simple homemade soda recipe you’ll be able to sip your soda in 12-24 hours!1: Bring 32 Oz (4 cups) of water to a boil in a stock pot that has a lid. While water heats, add the Botanicals to the steeping bag & tie off the top in a knot.
2: Once you see the first boiling bubble remove the pot from heat and let cool for 5 minutes. Then, add the bag to the pot. Dunk the bag & gently flatten with a spoon so the botanicals are submerged during the steep. Place a lid on the pot & set a timer for 6 minutes if making Cola, 15 minutes if making Root Beer.
3: After steeping remove the botanicals from the pot, but DO NOT squeeze the excess water from the bag. This will release unwanted bitter flavor. Discard the bag & solids. You’ve just made botanical “tea.”
4: OPTIONAL ADVANCED STEP: Caramelize Sugar
If you do not want to follow this step, you can skip ahead to Step 2: Make Your Cola Syrup.
If you’d like to caramelize some sugar for your Cola Syrup (for darker color & richer flavor), follow these steps. View a step by step instructional video of this process here.
• Measure ½ Cup of the Demerara Sugar & pour into a small saucepan. Shimmy the pan to create an even layer. Reserve the rest of the Demerara Sugar for later.
• Add 1 Fluid Oz (2 Tablespoons) of water to the pan to cover the sugar. NOTE: This is just enough water to help with the caramelization reaction, so it may not wet all of the sugar.
• Heat the saucepan on medium heat until you reach a steady bubbling simmer. Once achieved, set a 5 minute timer. DO NOT stir or mix the sugar - you must avoid intervening with the natural reaction. There will be lots of bubbles, the color will gradually darken and you’ll notice fragrant butterscotch & nutty aromas.
• After 5 minutes, the color should be quite dark, you’ll smell caramel candy aroma & the bubbles will release puffs of steam. At this point, reduce heat to low. But if the color isn’t dark enough yet, continue simmering 1-3 more minutes before reducing heat.
• Measure 3 Tablespoons (1.5 Oz) of water & have the saucepan’s lid ready. Carefully add water to the pan & quickly cover the pan with the lid - there will be lots of steam. Keep the lid on & the pan on low heat for at least 3-5 minutes to simmer. Even if you see sugar crystals on the walls of the pan resist the urge to stir just yet - this trapped steam is necessary to help dissolve any lingering sugar crystals.
• Remove the lid & stir with a spoon. If clumps or crystals remain, increase heat slightly to help melt. You’ll end up with a thin, dark brown syrup. Remove pan from heat, cover & set aside for Step 2: Make Your Cola Syrup.
1. Bring the pot containing your botanical “tea” up to medium-high heat. After a few minutes, add ¼ Teaspoon of Salt & the Demerara Sugar. Gradually add the Maltodextrin, breaking up any clumps & dissolving completely. If you caramelized any Demerara Sugar, add it to the pot now. If the caramel sticks to the saucepan, pour some of the hot botanical “tea” into the pan to help loosen it.
2. Let simmer for 3-5 minutes, stirring occasionally to ensure all ingredients are dissolved and well mixed.Then remove the pot from heat.
3. Allow the pot contents to cool to room temperature (without lid), this will take 30+ minutes.There shouldn’t be any visible steaming and the tea should feel luke-warm to the touch.
4. You’ve just made your own soda Syrup! If not using right away, store in a sealed container in the fridge.
Now that you’ve crafted your syrup there are a few options for carbonating, bottling & enjoying your soda. Option 1 is our preferred & recommended method.
Option 1 - Add Syrup to Seltzer (Recommended)
Create an instant glass of soda by combining 1 part syrup with 3 parts seltzer. Feel free to use store bought seltzer water (we like Topo Chico) or a SodaStream® machine. Adjust the syrup to seltzer ratio depending on your personal tastes. Syrup can be stored for 6 weeks in the fridge. This method helps your homemade soda last longer & allows you to pour the perfect glass every time.
Option 2 - Carbonate in 2 Liter Bottles
1. Using two 2 Liter plastic soda bottles and the included Bottling Kit (yeast & specialty bottle caps), you can naturally carbonate your own soda. DO NOT use glass bottles or beer bottles. Carbonating this way will take 12-24 hours & requires frequent monitoring during that time.Yeast is a living organism that converts sugars into CO2 through fermentation. If bottles are left unattended, the yeast will continue to create carbonation indefinitely & bottles can explode. If you don’t have time to monitor your bottles just yet, you can refrigerate your soda syrup in a sealed container until you’re ready to bottle. Bottles can be stored for 1 week in the fridge.
2. Clean your soda bottles and rinse well. Remove the tamper resistant cap rings that may have been left behind. Discard the caps that came on the bottles - you’ll be using the specialty caps included with this kit instead. 2. Using the included funnel, divide your soda syrup evenly between the two bottles. Top off each bottle with cool filtered water to about 3 inches below the top. Gently swirl to combine.
3.Sprinkle ¼ Teaspoon of Yeast into each bottle. There will be plenty of leftover yeast in the packet, which you can discard.
Use the Bottle Caps included in this kit to seal the bottles. Push and twist, but do not over tighten, this can lead to the seal bunching and carbonation escaping. These caps are specially designed to ensure your bottles do not over-carbonate and explode.
4. Store the sealed bottles at room temperature (65-75°F) to allow them to carbonate - this process usually takes 12-24 hours. Roughly 12 hours after adding the yeast, check the bottles to see if they are hardening. Continue to check on the bottles every 6 or so hours to monitor their progress, keeping them at room temperature until they are hard like a new bottle of soda from the store. Once hardened like bottles you’d buy at the store, immediately place the bottles in the fridge and let chill for at least 12 hours before enjoying. Do not leave bottles stored at room temperature, otherwise bottles can explode. 6. Refrigeration will slow, but not completely stop the yeast from creating CO2 in the bottles.
To prevent over-carbonation of your soda, please enjoy your bottles within 1 week of placing 7. in the fridge. Excess CO2 and alcohol will begin to develop beyond this point, making bottles more dangerous to handle and making the flavor more bitter.
Make Craft Soda
Watch Our Soda-Making Video
See our soda recipe in action & follow along with our complete how-to video. This video is an accompaniment to our Root Beer Kit. We’ll walk you through every step listed above to help you execute this old fashioned soda recipe at home.
NOTE: the root beer and cola processes are essentially the same. The only difference is our homemade cola soda recipe uses a shorter botanical steep and less salt.
Troubleshooting and Expert Tips
New to homebrewing? Here are some of our most common soda making FAQs, plus our top tips for success making old fashioned soda with our DIY soda kits!4 liters of finished soda
No, our soda recipe produces a non-alcoholic drink.
Our Craft Cola Kit is brewed with tea & does contain caffeine in the finished product. Our Root Beer Kit is caffeine-free.
No, glass bottles are NOT recommended for this application. It’s important to use flexible & safe plastic 2 Liter soda bottles.
Our Root Beer Recipe Kit and Craft Cola Recipe Kit include all the ingredients you need to make your next batch of soda. Each soda recipe kit includes all the botanicals, sugars, yeast & bottle caps you need, without a funnel or another instruction booklet you already have.
Write a complete answer to the most frequent questions that your customers might have, such as important product information, shipping policies, payment issues or returns.
Customize Your Soda
Our DIY soda kits help you make 4 liters of non-alcoholic Root Beer or Craft Cola. But nothing’s stopping you from spiking your soda! Try our favorite drink recipes and other ideas for your homemade soda syrup!Soda Slush
To make a pair of Cola Slushies, you’ll need 24 oz of cola. Pour 12 oz of homemade cola into an ice cube tray & place in your freezer overnight. Once frozen, add the cola cubes to a blender along with 12 oz of cola and about 8 regular ice cubes. Blend to combine. Pour into a glass and serve with a straw or a spoon.Kalimotxo
Pronounced Calimocho, this cocktail is a tasty Red Wine & Cola concoction. Combine 3 oz Cola and 3 oz dry red wine in your glass. Top with ice and a dash of bitters. Garnish with an orange or lemon slice and enjoy!Root Beer Rickey
A “Rickey” cocktail is made with liquor, lime juice & carbonated water. Put a nostalgic twist on this cocktail equation with 2 oz Rye Whiskey + 1 oz Lime Juice + 4 oz Root Beer.Dirty Soda
You might have heard of the Dirty Soda trend online. It has a strange name, but this is a delicious treat that combines Cola, coconut & cream. To make a Dirty Cola, fill a glass with ice. Add 2 pumps (1 Tablespoon) of coconut syrup. Squeeze the juice from half a lime (1 Tablespoon) into the glass. Then pour 12 oz of Cola into the glass and stir to combine. Top with 2 tablespoons of heavy cream, which will curdle from the lime’s acid, but will still taste great! Serve with a straw to stir and incorporate all the flavors.Soda Float
Make a Root Beer or a Cola Float with your homemade soda. Freeze a mug for 10 minutes before assembling for best results. Pour 12 oz of cold Cola or Root Beer into your frozen mug. Top with 1 to 2 scoops of vanilla ice cream and enjoy!Root Beer Sundae
Instead of carbonating ALL of your homemade Root Beer Syrup, save some for dessert! Drizzle a scoop of vanilla ice cream with Root Beer Syrup for a twist on a Root Beer Float.Why Make Your Own Soda?
Homemade soda offers a variety of benefits, making it an enjoyable and rewarding experience for anyone who loves fizzy beverages. Not only is it fun, but crafting soda from scratch with all-natural ingredients ensures you’re drinking a healthier, more personalized beverage free from mystery ingredients or artificial additives. Here’s a closer look at why homemade soda is a fantastic choice:
- Healthier Ingredients: When you make soda at home, you have complete control over what goes into your beverage. Store-bought sodas often contain high-fructose corn syrup, artificial flavors, and preservatives.
- Fun and Rewarding: The process of crafting soda is not only satisfying but also a fun activity that can be enjoyed solo or with family and friends. Making soda is a hands-on experience that offers
- Cost Effective: Once you understand the basic soda-making process, you can make sodas syrups from scratch with a variety of botanicals and sugars.
Simplify the Process with the Craft a Brew Soda Making Kit
Making old fashioned soda at home is easy with a Craft a Brew Soda Starter Kit. Get a complete starter kit with all the tools & natural ingredients you need to start brewing small batch sodas at home.
